How are you currently as of this ideal period ?, My spouse and i pray you’re properly and content generally. through this web site I am going to introduce the recipe for cooking Japanese Angel Soft Milk Loaf that is currently extremely popular with various groups, which has a easy and fast method of making relatively, this Japanese Angel Soft Milk Loaf food is in great demand by lots of people, and tastes good also, tends to make all of your household and friends You like it potentially.
Japanese Angel Soft Milk Loaf cuisine is really a dish that’s classified as an easy task to make. through the use of components that exist around you quickly, you may make it in simple actions. You may make it for family or friends events, and it could be shown at several recognized functions perhaps. I am certain you will see lots of people who just like the Japanese Angel Soft Milk Loaf dishes you make.
How to make soft and fluffy Hokkaido Milk Bread (Recipe) - Cách làm bánh mì sữa Hokkaido. Японский Суфле Чизкейк [Супер Пушистый И Покачивающийся] Japanese Souffle Cheesecake. Soft Banana Bread Loaf 부드러운 바나나빵 만들기. This recipe is our take on Japan's Hokkaido milk bread, a loaf so light it's often described as feathery.
Alright, don’t linger, let’s task this japanese angel soft milk loaf formula with 15 substances which are undoubtedly easy to find, and we have to process them at the very least through 17 ways. You should devote a while on this, so the resulting food could be perfect.
Ingredients of Japanese Angel Soft Milk Loaf:
- Make ready 92 g - (184g, not ml) whole milk or (12g skim milk and 80g water)
- Need 1.5 g (3 g) of dry yeast
- You need 125 g (250 g) of strong flour or wholemeal flour
- Get 15 g for sugar (30g)
- Give 1.5 g for or 1/4 tsp (3g or 1/2 tsp) salt
- You need 10 g (20 g) of unsalted butter, room temperature (If you use salted butter, reduce the salt amount.)
- Give of nuts and seeds - option
- Require for 【With 120g raisin yeast starter dough】 example
- Take 120 g (240 g) of raisin yeast starter dough
- You need 65 g (130 g) - strong flour = 125-(120/2)
- Take 20 g (40 g) - whole milk = 92x0.87 -(120/2)
- Provide 4 g (8 g) for skim milk = (120/2)x0.13
- Require for No dry yeast
- Get for The rest of the ingredients remain the same
- Prepare - Rasin Yest starter at:https://cookpad.com/uk/recipes/13322647
It is quite similar to Hokkaido Milk Loaf but is less sweet and eggless. If you have some doubts, read this section before proceeding! Red bean milk loaf is a delightfully soft and fluffy Asian sweet bread, with the added goodness of nutritious red adzuki beans. You'll find that this loaf is super tender, perfectly fluffy and delightfully springy!
Japanese Angel Soft Milk Loaf step by step:
- Lay parchment sheet or oil the bread tin
- Heat the milk in a microwave about 20 (40) seconds to make it warm. Or just heat it up in a pan. Please never make it too hot as yeast will die at 60 degrees. Around the temperature of bath would be perfect. If it is too hot, leave it till it becomes warm.
- Add yeast into the warm milk and mix well.
- Add flour, sugar, salt in a bowl or on board and mix them. Then, add the warm milk and mix them. Then, knead by hands for about 10 mins on a board or knead for about 7-10 mins with a stand mixer using a kneading hook until gluten has created and the dough does not stick to the bowl. The time will depend on your machine.
- Please knead well here until the dough becomes stretchy and gluten is formed. When gluten is formed, you touch the dough and it doesn't stick to your hand. Also if you stretch it becomes very thin sheet almost see-through it. I use speed 2 or 3 on my stand mixer. If you too strong, it becomes very sticky.
- Add chopped or soft butter and knead further for about 3-5 mins until the dough becomes smooth and not stick to the bowl like the last photo. It should look silky and smooth.
- Take the dough out and make it round with the motion on tucking inside at the bottom. It should become smooth like the photos below. If it is still too sticky, you need to knead with hands until it becomes easier to handle it. I usually hit it like a ball and it will become less sticky and smooth. - - Add seeds or nuts if you wish. Cover it with cling film and leave it for 30-40 mins until it becomes about twice. It can take much longer. I put a hot water with 36-45℃ beneath like the last photo.
- Test the fermentation with a finger coated by flour. If it is the hole remains, the first fermentation has been done.
- After having tested the fermentation, take out the dough and punch it down. Make it round again. Cut it into 8 (16) or 6 (12) pieces depends on how you like. Make them round. Place them in with the tucked parts as the bottom. Cover it with a damp cloth and leave 15 mins. - - (You could omit this resting step. However, you will get a better result if you do. When I prepare at night and leave them in the fridge, I omit it as it seems it does not make many differences, if I leave them in the fridge.)
- Make them round again with the motion of tucking and place them in the bread tin with the tucked parts on the bottom. Add some more seeds on the top, if you wish. - - (If you wish to bake them in the morning, you could leave them overnight in the fridge till next morning.)
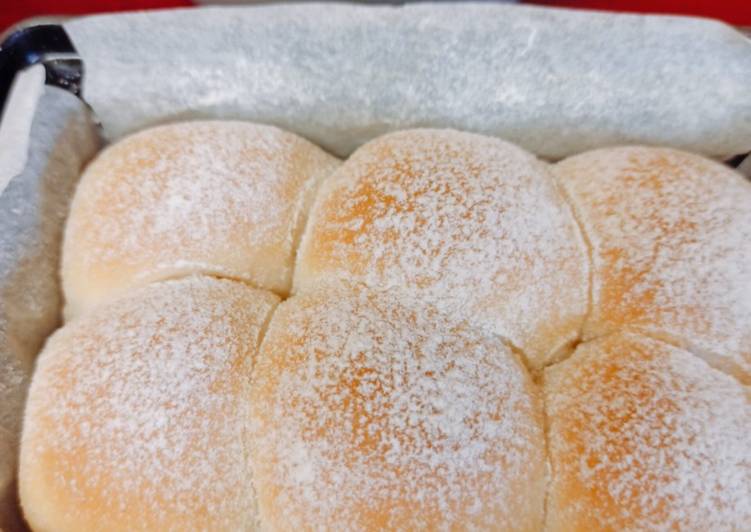
- Leave it in a warm place until it becomes 2-2.5 times, usually for about 30-60 mins, depends on the room temperature and the yeast. Dust them with flour. (The second fermentation) - - If you left them in the fridge overnight, please put them in a warm water bath beneath or something. Otherwise, it will take for ages to get this second fermentation done. When the yeast was strong, it is already ready to bake when you take out from the fridge. Then, omit the second fermentation. )
- Preheat the oven at 180℃.
- Put the bread tin in the oven and turn down the temperature as 160℃. - Then, bake at 160℃ for about 18 mins. Please make sure you reduce the temperature to 160℃. If you bake at 180℃, your bread becomes harder. If your oven is powerful enough and it does not go down the temperature when you open, just preheat it as 160℃.
- After having baked for 18 mins, it is done. You can see the video of how soft they are at: https://www.instagram.com/p/B_YWiW6nIfo/?utm_source=ig_web_copy_link
- You can make character breads with this dough such as bear, cat, Totoro, rabbits etc which children love. - - Bear recipe is here. https://cookpad.com/uk/recipes/12351787-milk-bear-loaf
- Decorated with those.
Not to worry, these slices are firm enough for you to slice neatly without getting squished. I've been trying my absolute hardest to make Japanese milk bread as soft as what I find in Japanese supermarkets (or even T&T). I've tried multiple recipes: milk and cream, only milk, different ratios of ingredients, different Does anyone know what actually causes softness in the shokupan loaves? When we published our Japanese milk bread recipe earlier this month, our Test Kitchen worked with Alessandra Gordon, owner of Seattle-based purveyor The adapted method cuts out a few steps in the shaping process, but the result is a loaf as soft, white, and tender as any. Bake for Happy Kids is top Singapore Australia baking cooking food blog written by Zoe, who lives in Melbourne.
Alright, above possesses described briefly about causeing this to be japanese angel soft milk loaf recipe. at the very least it could be an illustration for you yourself to broaden your expertise inside the culinary world. if you want to save our web page address in the browser, in order that anytime there’s a brand-new food selection of quality recipes, you may get the info. and in addition share the hyperlink with this website together with your colleagues and friends, thank you.